
After installation of the plugin it needs to be filled. And to fill it, it’s the most effective when you start with filling some labels, so you can later add the different dishes without any disruption.
In the WordPress dashboard you first search for the ‘Restaurant menu’ item. When using a translation, the text might differ, but you also can recognize it by the icon.
When you click it, it unfolds to a larger menu
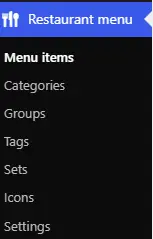
- Each dish or drink on the menu we call a ‘Menu Item‘, a ‘menu item’ is simply something that can be ordered from the menu.
- Categories are more or less the courses, possibly subdivided by sub-categories
- Groups you can use to filter specific kinds of food. A common way is to filter it on dietary requirements, but if you have other needs, you can use it in different ways. And if see no use for using it, you’re free not to fill it.
- Tags are also free to use or not to use. They’re little ‘labels’ about menu items. For example ‘new’, ‘only this week’ and other terms to get the readers attraction.
- Sets are menu items you want to show together, to give it special attention. More information when we discuss the ‘Menu Selection’ widget.
- Icons is the place to upload icons you want to use in the menu
- Settings is the page with the settings for the menu. And although it is the last option in the list, when we start filling the menu, it’s the first place to start.


